Search for answers or browse our knowledge base.
Can't find the answer you need here? Contact our support team and we'll gladly help you.
Adding Light Blue events to an Apple calendar
Light Blue’s in-built calendar is great for viewing all your Light Blue events, however you may want to also have these events showing in your Apple Calendar so you can see everything you’re up to in the one place.
The great news is that rather than having to manually duplicate all these events, there are a couple of options for them to be added and updated automatically.
- “Subscribe in iCal”. Light Blue creates a calendar feed URL for your chosen Light Blue events which, once you’ve subscribed to, will automatically appear in your Apple Calendar. This is our recommended approach.
- “Publish to macOS Calendar”. This approach automatically publishes Light Blue events to your Apple Calendar. However as it needs the Light Blue desktop app to be running before any changes are published and all devices to be using the same iCloud account it’s not our recommended approach!
An important point to note is that the synchronisation in both options is one way, i.e. Light Blue remains the source for your information and any changes you make in your Apple Calendar won’t be pulled back into Light Blue.
1. “Subscribe in iCal”
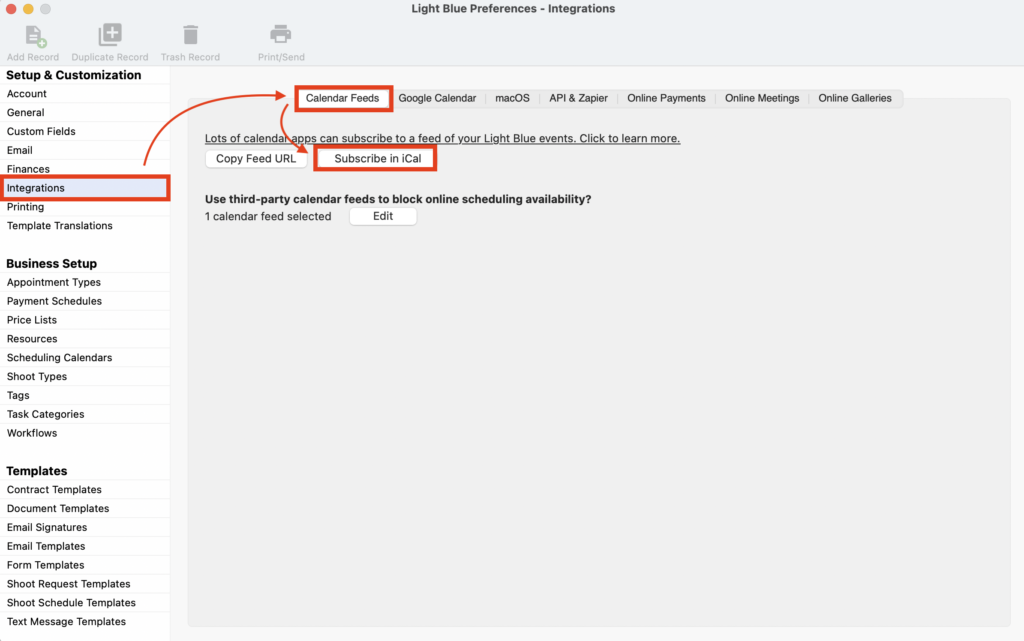
- In Light Blue Preferences, click on “Integrations”.
- In the Calendar Feeds tab, click on the “Subscribe in iCal” button.
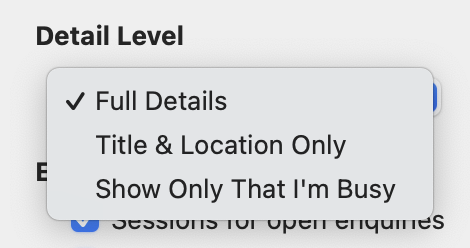
- From the Detail Level dropdown menu choose the amount of information you want to include in the calendar feed URL.
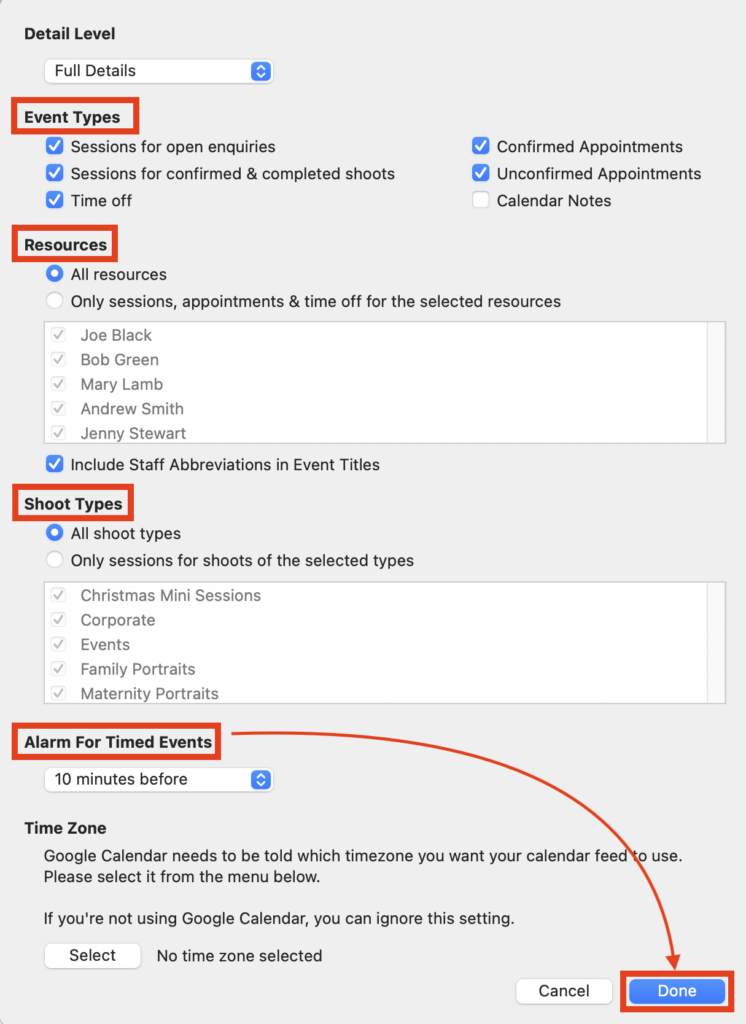
- Check which Events, Resources and Shoot Types you want to include and whether you’d like an alarm to be added and click “Done”.
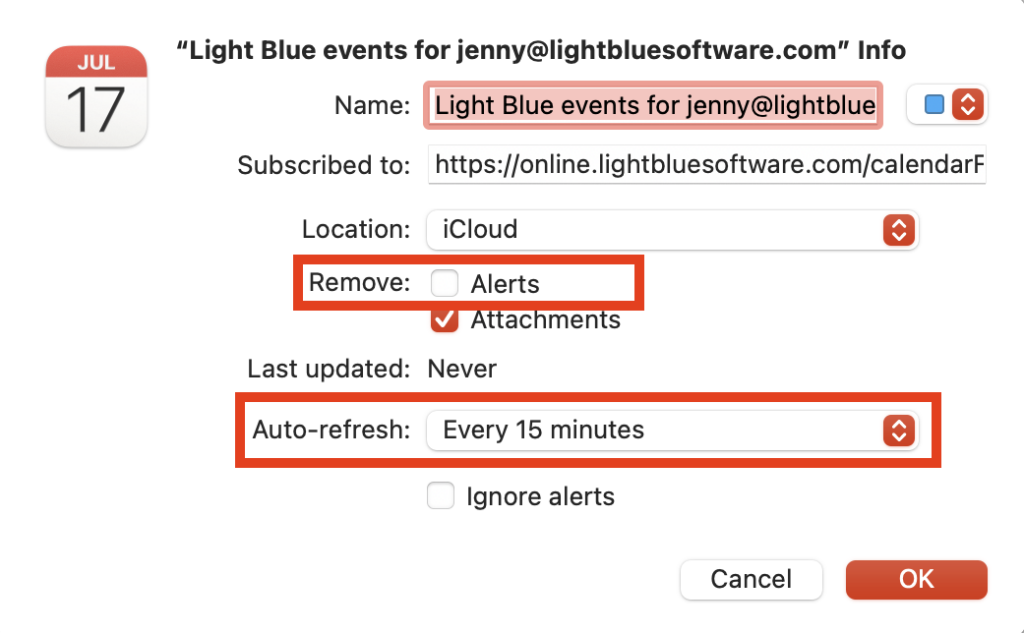
- Light Blue will then generate the unique calendar feed URL for your chosen settings and Apple Calendar will ask you to confirm your subscription to this calendar.

- Confirm the details ensuring you uncheck the Remove Alerts if you included alarms in the calendar feed and that you’ve reviewed the Auto-refresh timeframe; we recommend every 15 minutes.
- Click “OK” and the chosen settings for your Light Blue events will now automatically appear in your Apple Calendar and be updated any time you make a change in the Light Blue desktop or iOS app. NB. Remember that the synchronisation is one way, i.e. Light Blue remains the source for your information and any changes you make in your Google Calendar won’t be pulled back into Light Blue.
⭐️ Top tip: It’s possible to create multiple calendar feed URLs for different combinations of Event Types, Resources and Shoot Types; simply repeat the above steps as many times as you need! Handy if you want to split the Light Blue events out in particular ways to make them easier to view in your Apple Calendar or, for example, if you want members of your team to only view the Light Blue events applicable to them.
2. “Publish to macOS Calendar”
- Not our recommended approach however if you do choose this method the first step is to create a new calendar in your Apple Calendar that your Light Blue events will be published to.
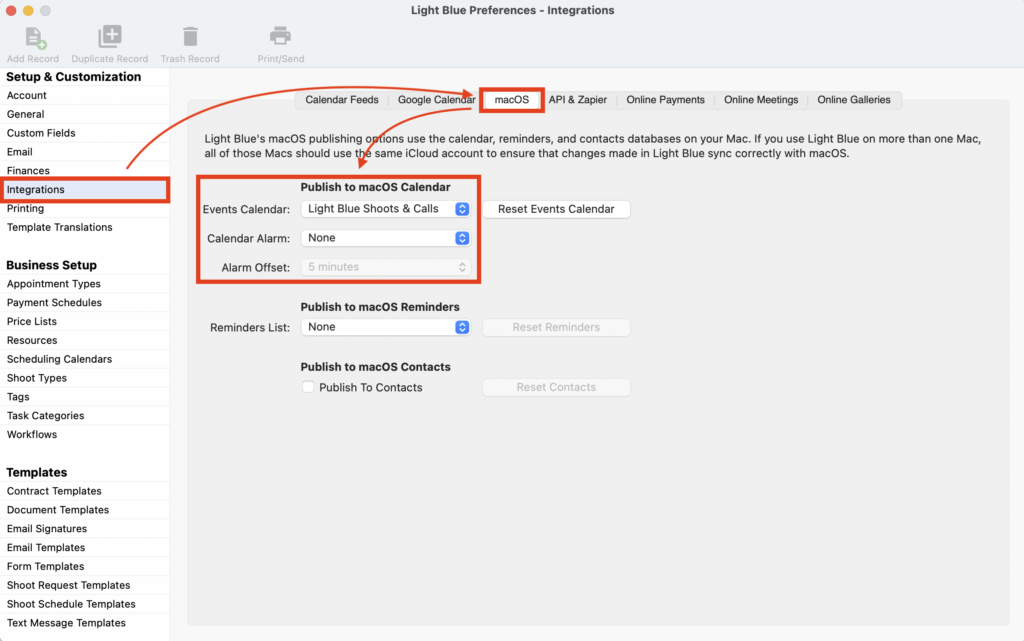
- Once you’ve done that, in Light Blue Preferences, click on “Integrations”.
- Then in the macOS tab and choose the new Calendar you’ve created from the “Events Calendar” drop-down menu. You can also choose whether you want an alarm to be set. Light Blue Shoots, Appointments and Time Off events will now be published to your chosen calendar in the Apple Calendar and be updated any time you make a change so long as your Light Blue desktop app is running. NB. Remember that the synchronisation is one way, i.e. Light Blue remains the source for your information and any changes you make in your Google Calendar won’t be pulled back into Light Blue.
Troubleshooting
If there are no calendar options showing in the Events Calendar dropdown menu you need to give Light Blue access to your Apple Calendar:
- Open the Mac System Settings/Preferences.
- Select Privacy & Security followed by Privacy.
- Select Calendars.
- Turn on permissions for Light Blue (or turn off and turn on again!).
- Quit and relaunch Light Blue.